A virtual point is an I/O point that is not associated with any physical hardware. It isn't "real", it's "virtual". It behaves like any other I/O point. It can be set to high or low, on or off. But there is no way outside of Intelli-Site to verify it's state. Think of a virtual point as a cyber-LED that you can turn on and off. You can check to see if it is on or off, but you can't really see it.
Virtual Points are spots in memory that can be used to store the results of previous actions, coordinate subsequent actions, signal state changes, etc. In fact, on the "Properties..." of most if not all RTUs is a section called "RTU Setup". Part of this set up is a place to drop a point. This point will be set on also known as high when the RTU is virtual and will be cleared when it isn't. This is a good place for a virtual point.
When we look deeper, we see that all I/O points are virtual points tied to a real, physical device. I/O points reflect the state of the real world input or output. Virtual points are I/O points that we can use to reflect virtually anything. Instead of a physical device setting or clearing the point, a virtual point is set or cleared by the Server.
There is a specific RTU for Virtual Points. This RTU comes in two flavors Virtual Inputs and Virtual Outputs. There is no difference between Virtual Inputs and Virtual Outputs other than the names. The names can be changed to reflect how the RTU and the points are to be used. For each flavor of Virtual RTU, the points come in groups of 16, 32, 64, 128, and 256. Each point can be used independently of the others; they can be used wherever and however needed.
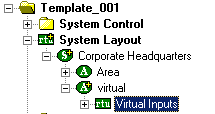
Like all RTUs, Virtual points are added under System Layout. For ease of use, you may wish to add a new area. In the example below we added an area called "virtual". It is here we will add the Virtual RTU.
- Right click on the Area in which you wish to add the Virtual RTU. From the context menu, select "Add Node...". The "Add Node" dialog will appear.
- Scroll through the node types listed and locate the Virtual Inputs and Virtual Outputs. Remember Virtual Inputs and Outputs are the same thing only the names are different. Highlight the desired number of Virtual Points. If you don't know how many you need, select "Virtual Inputs". This will give you 16 points. If you need more later, the number of points can be increased.
- Click <Add Node>. A new Virtual Inputs node will be added to the project tree.

By expanding the Virtual Inputs RTU, you will find 16 Virtual Points to use in your project programming.
Note: Under System Control -> System RTU you will find 16 Virtual Points. These can be used like any virtual point but we do not recommend it. They are only 16 points, none can be added. Also, treating the Virtual Points as an RTU is consistent with the rest of the definition of the site, making locating the correct Virtual Point more intuitive and logical.
The number of virtual points for any one node can be increased to a to total of 256 points.
- Expand the Virtual RTU.
- Right-click on the folder. It is named either Input or Output.
- Click on "Add Node". A single virtual point will be added to the end of the list.